On top of a physical machine, once we installed set of packages and enabled the Virtualization, we can create virtual machines within it. We can create/manage in three ways...
1. Virtualization shell (virsh CLI).
2. Virtual Manager -virt-manager (GUI).
3. Ubuntu-vm-builder (Command Line tool).
At first I am going to show you the steps to create vm using commands.
Command: virt-install
Options: --name --ram --vcpus --disk path ---cdrom ---boot --location --console
USAGE:
root@ubuntu-kvm:~# virt-install
WARNING KVM acceleration not available, using 'qemu'
ERROR
--name is required
--memory amount in MiB is required
--disk storage must be specified (override with --disk none)
An install method must be specified
(--location URL, --cdrom CD/ISO, --pxe, --import, --boot hd|cdrom|...)
root@ubuntu-kvm:~#


Once logged in,


We can check the newly created vm by,
root@ubuntu-kvm:~# virsh list
Id Name State
----------------------------------------------------
1 VM1 running
root@ubuntu-kvm:~#
root@ubuntu-kvm:~# virsh -c qemu:///system list
Id Name State
----------------------------------------------------
1 VM1 running
root@ubuntu-kvm:~#
We can also enter the commands from virsh terminal....
root@ubuntu-kvm:~# virsh
Welcome to virsh, the virtualization interactive terminal.
Type: 'help' for help with commands
'quit' to quit
virsh #
virsh # list
Id Name State
----------------------------------------------------
1 VM1 running
virsh #
virsh # exit
root@ubuntu-kvm:~#
By this we created a vm using CLI of virsh environment. Now let us create another VM using GUI virt-manager....
virt-manager
As soon as we entered the virt-manager command, GUI screen will be popped out...

Click on create a new virtual machine...

We are using local media so click on forward...

Browse the iso image location....


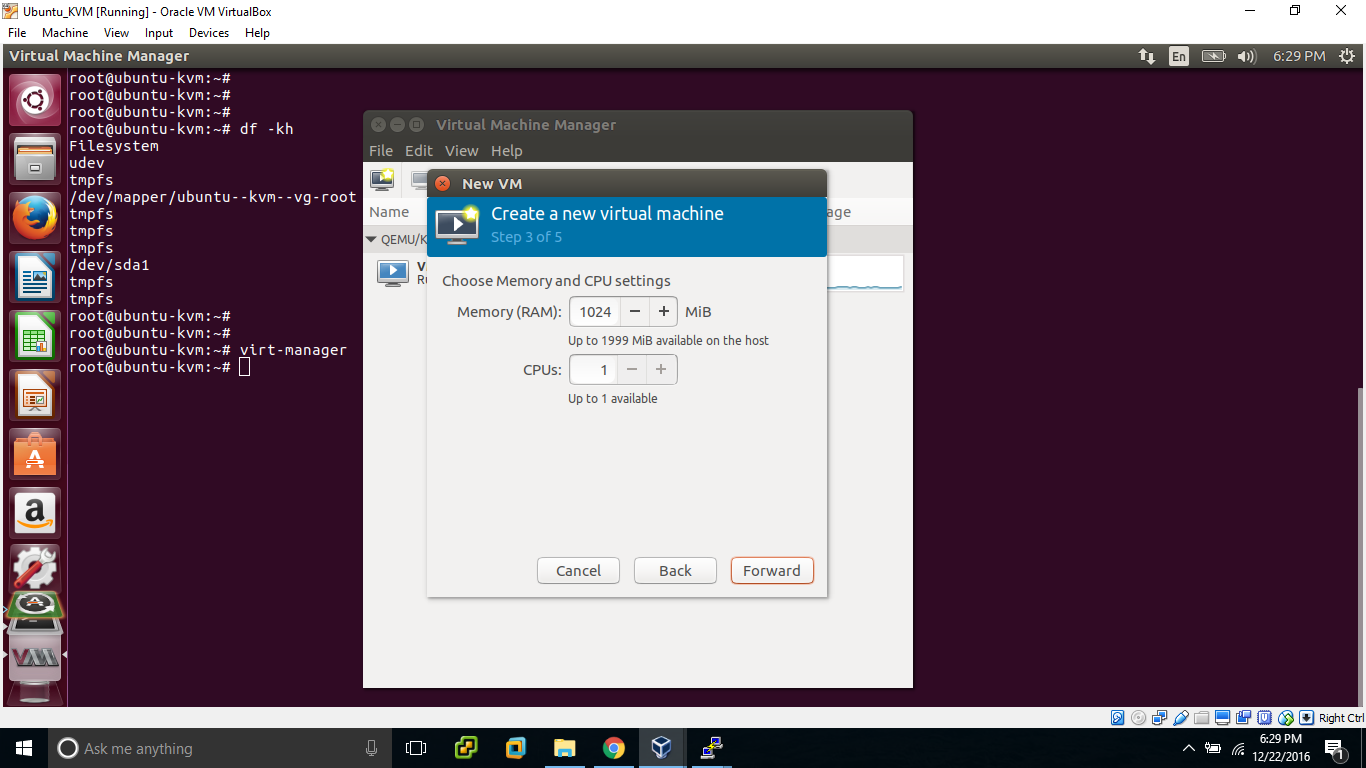
Choose the Memory and vcpus for our domain/vm...

Choose the Storage for our vm...

Check the allocated resources, if we want we can do some network selection like IP assigning, router an netmask....

Initated the domain or vm creation process....

Windows setup is started....

From now, it is general process of Windows OS installation....

Setup copying files is about to complete....

First reboot during the installation process....


1. Virtualization shell (virsh CLI).
2. Virtual Manager -virt-manager (GUI).
3. Ubuntu-vm-builder (Command Line tool).
At first I am going to show you the steps to create vm using commands.
Command: virt-install
Options: --name --ram --vcpus --disk path ---cdrom ---boot --location --console
USAGE:
root@ubuntu-kvm:~# virt-install
WARNING KVM acceleration not available, using 'qemu'
ERROR
--name is required
--memory amount in MiB is required
--disk storage must be specified (override with --disk none)
An install method must be specified
(--location URL, --cdrom CD/ISO, --pxe, --import, --boot hd|cdrom|...)
root@ubuntu-kvm:~#
After installing libvirt-bin, we can use the virsh commands...
virsh CLI
To install new vm,
root@ubuntu-kvm:/test# virt-install --name VM1 --ram 1024 --vcpus=1 --disk=/var/lib/libvirt/images/VM1.img,size=8 --cdrom /test/ubuntu-16.10-server-amd64.iso
WARNING KVM acceleration not available, using 'qemu'
WARNING Graphics requested but DISPLAY is not set. Not running virt-viewer.
virt-viewer is not running, I am running these commands from putty.....
WARNING No console to launch for the guest, defaulting to --wait -1
Starting install...
Allocating 'VM1.img' | 8.0 GB 00:00:02
Creating domain... | 0 B 00:00:00
Domain installation still in progress. Waiting for installation to complete.
Use the command virt-viewer to view the installation process,

Click on "connect", then we can view the installation....

From now it is all normal installation process....

Other than above options, we can also give different options like...
virt-install --connect qemu:///system
-n
vm10 (name)
-r
1024 (ram)
--vcpus=2
(virtual cpu)
--disk
path=/var/lib/libvirt/images/vm10.img,size=12 (disk
and its size)
-c /test/ubuntu.iso
(cdrom)
-x “console=tty”
--os-type
linux (specify OS type)
--graphics (nographics)
--accelerate
--network=bridge:br0
(to specify network card)
--virt-type
HV_TYPE (to specify Hypervisor name (kvm, qemu, xen, ...))
--hvm (to specify guest should be a fully
virtualized guest)
--autostart (to autostart domain on host boot
up)
Still many other options, we can check the usage by "virt-install --help".
Installation process is about to complete...

root@ubuntu-kvm:/test# virt-install --name VM1 --ram 1024 --vcpus=1 --disk=/var/lib/libvirt/images/VM1.img,size=8 --cdrom /test/ubuntu-16.10-server-amd64.iso
Starting install...
Allocating 'VM1.img' | 8.0 GB 00:00:02
Creating domain... | 0 B 00:00:00
Domain installation still in progress. Waiting for installation to complete.
Takes bit long time, once installation completed it will be....
Domain has shutdown. Continuing.
Domain creation completed.
Restarting guest.
root@ubuntu-kvm:/test#
Below is the output of virt-viewer upon reboot of VM....

Once logged in,


We can check the newly created vm by,
root@ubuntu-kvm:~# virsh list
Id Name State
----------------------------------------------------
1 VM1 running
root@ubuntu-kvm:~#
root@ubuntu-kvm:~# virsh -c qemu:///system list
Id Name State
----------------------------------------------------
1 VM1 running
root@ubuntu-kvm:~#
We can also enter the commands from virsh terminal....
root@ubuntu-kvm:~# virsh
Welcome to virsh, the virtualization interactive terminal.
Type: 'help' for help with commands
'quit' to quit
virsh #
virsh # list
Id Name State
----------------------------------------------------
1 VM1 running
virsh #
virsh # exit
root@ubuntu-kvm:~#
virt-manager
As soon as we entered the virt-manager command, GUI screen will be popped out...

Click on create a new virtual machine...

We are using local media so click on forward...

Browse the iso image location....


Choose the Memory and vcpus for our domain/vm...
Choose the Storage for our vm...

Check the allocated resources, if we want we can do some network selection like IP assigning, router an netmask....

Initated the domain or vm creation process....

Windows setup is started....

From now, it is general process of Windows OS installation....

Setup copying files is about to complete....

First reboot during the installation process....


By the time of completion, we will be having 2 VMs within our Host Ubuntu machine...

root@ubuntu-kvm:~# virsh list
Id Name State
----------------------------------------------------
2 VM1 running
5 win2003 running
root@ubuntu-kvm:~#
Above, if you observe the instance ID is 5, ID will be changed upon every reboot. It means when we created VM1 its ID is 1 and when it is rebooted ID is 2.
Similarly when win2003 is created its ID is 3, during installation process it was rebooted twice and so ID is 5.
Ubuntu-vm-builder
Now let us create another VM using Ubuntu-vm-builder utility....
root@ubuntu-kvm:~# ubuntu-vm-builder
2016-12-22 19:34:13,623 INFO : logging to file: /tmp/tmpaIORvG
Usage: ubuntu-vm-builder hypervisor suite [options]
ubuntu-vm-builder: error: You need to specify at least the hypervisor type and the series
root@ubuntu-kvm:~#
OR ELSE
root@ubuntu-kvm:~# vmbuilder
2016-12-22 19:46:50,755 INFO : logging to file: /tmp/tmpGF7Z7n
Usage: vmbuilder hypervisor distro [options]
vmbuilder: error: You need to specify at least the hypervisor type and the distro
root@ubuntu-kvm:~#
Let us create a vm using some basic options....
root@ubuntu-kvm:~# vmbuilder kvm ubuntu --domain VM2 --cpus=1 --mem=1024 --dest /var/lib/libvirt/images/VM2.img --iso /test/ubuntu-16.10-server-amd64.iso --libvirt qemu://system
2016-12-22 19:52:08,987 INFO : logging to file: /tmp/tmp4xfqeU
2016-12-22 19:52:09,014 INFO : Calling hook: preflight_check
2016-12-22 19:52:09,018 INFO : Calling hook: set_defaults
2016-12-22 19:52:09,020 INFO : Calling hook: bootstrap
2016-12-22 19:52:09,030 INFO : mount: /dev/loop0 is write-protected, mounting read-only
2016-12-22 19:52:09,161 INFO : Cleaning up
2016-12-22 19:52:09,192 ERROR : Process (['/usr/sbin/debootstrap', '--arch=amd64', 'lucid', '/tmp/tmp0RLlyc', 'file:///tmp/tmpNtk6ch']) returned 1. stdout: I: Retrieving InRelease
************** OUTPUT TRUNCATED **************
This is followed by general steps of Ubuntu installation..... Once the installation is done, we have 3 VMs within our host machine.
root@ubuntu-kvm:~# virsh list
Id Name State
----------------------------------------------------
2 VM1 running
5 win2003 running
7 VM2 running
root@ubuntu-kvm:~#
Different options which we can provide with vmbuilder command during creation of vm...
vmbuilder USAGE:
ubuntu-vm-builder kvm --domain VM2
--arch i386 or amd64 (to specify CPU architecture)
--hostname myvm (to specify hostname)
--user ubu (to create a user)
--pass ubu (to assign password to user)
--bridge=br0 (to specify NIC)
--ip 10.0.0.222 (to assign ip)
--mask 255.255.255.0 (to assign netmask)
--net 10.0.0.0 (to define network range)
--bcast 10.0.0.255 (to assign broadcast)
--gw 10.0.0.1 (to assign gateway)
--dns 10.0.0.1 (to assign DNS)
--rootsize=102400 (to allocate root size)
--addpkg openssh-server (to add additional package)
We created KVMs in all the three different ways. In this post, I concentrated only on the different utilities which we use to create/manage VMs in Linux.
######################################################################################
No comments:
Post a Comment