Total Pageviews

Wednesday, 30 November 2016

Host Side Scanning of Luns (OpenFiler Storage) !!!

In this post we are going to learn how to scan luns from host side. In many of the interviews it is a common question, "Explain me step by step how do you make a LUN visible at host side?"

Let me make it clear what exactly Host side scanning means. Whenever Sys Admins request for new luns, Storage team will assign the LUNs as per the request. Then it is an admin task to make it visible at OS level for the application use.

To make a LUN ready to use and to make it visible at host side we need to follow few steps carefully. When it comes to LUNs visibility and Storage, iSCSI target and iSCSI initiator are the most common terms we come across.

iSCSI initiator initiates a SCSI session, that means it requests the LUN (our Host server).
iSCSI target is the Storage Network, that means it is the server which contains the LUNs (Target Node -- OpenFiler).

In my scenario, I created 4 Luns in my OpenFiler storage. Now I will show you the steps to make them visible at my Solaris host.

Steps we need to follow,

1. Check whether iscsitgt service is online or not. (Make it online)
2. Using "iscsiadm" command, we need to add our iSCSI target to our host.
3. Then comes the actual host side scanning using "devfsadm" command.


Output of format command before assigning luns...

bash-3.2# echo| format
Searching for disks...

AVAILABLE DISK SELECTIONS:
       0. c0d0 <▒x▒▒▒▒▒▒▒▒▒@▒▒▒ cyl 2085 alt 2 hd 255 sec 63>
          /pci@0,0/pci-ide@1,1/ide@0/cmdk@0,0
Specify disk (enter its number): Specify disk (enter its number):

bash-3.2#

Proceed with our steps,

bash-3.2# svcs iscsitgt
STATE          STIME    FMRI
disabled       15:12:02 svc:/system/iscsitgt:default
bash-3.2#

bash-3.2# svcadm enable iscsitgt
bash-3.2#

bash-3.2# svcs iscsitgt
STATE          STIME    FMRI
online         17:34:06 svc:/system/iscsitgt:default
bash-3.2#

Then the Step 2,

bash-3.2# iscsiadm list static-config
bash-3.2#                                                           ---- No targets are available.

Add the iSCSI target, (Careful with the name, when you have many available targets at Storage end)

bash-3.2# iscsiadm add static-config iqn.2006-01.com.openfiler:tsn.d896e2cf3975,10.0.0.129:3260
bash-3.2#                                                     --- Port 3260 is a TCP port for iSCSI traffic.
bash-3.2# iscsiadm list static-config
Static Configuration Target: iqn.2006-01.com.openfiler:tsn.d896e2cf3975,10.0.0.129:3260
bash-3.2#

Then the final step, scanning disks at host side....

bash-3.2# devfsadm -i iscsi
bash-3.2#

bash-3.2#
bash-3.2# echo|format
Searching for disks...

AVAILABLE DISK SELECTIONS:
       0. c0d0 <▒x▒▒▒▒▒▒▒▒▒@▒▒▒ cyl 2085 alt 2 hd 255 sec 63>
          /pci@0,0/pci-ide@1,1/ide@0/cmdk@0,0
       1. c2t2d0 <OPNFILE-VIRTUAL-DISK   -0    cyl 1529 alt 2 hd 128 sec 32>
          /iscsi/disk@0000iqn.2006-01.com.openfiler%3Atsn.d896e2cf39750001,0
       2. c2t3d0 <OPNFILE-VIRTUAL-DISK   -0    cyl 2043 alt 2 hd 128 sec 32>
          /iscsi/disk@0000iqn.2006-01.com.openfiler%3Atsn.d896e2cf39750001,1
       3. c2t4d0 <OPNFILE-VIRTUAL-DISK   -0    cyl 1017 alt 2 hd 64 sec 32>
          /iscsi/disk@0000iqn.2006-01.com.openfiler%3Atsn.d896e2cf39750001,2
       4. c2t5d0 <OPNFILE-VIRTUAL-DISK   -0    cyl 505 alt 2 hd 64 sec 32>
          /iscsi/disk@0000iqn.2006-01.com.openfiler%3Atsn.d896e2cf39750001,3
Specify disk (enter its number): Specify disk (enter its number):
bash-3.2#

If we have EMC storage in our environment, then there are other commands to deal with powerpath to scan the luns. Similarly to make use of these luns under Veritas control, we use vxscandisks command to scan.... 

Regarding above scenarios, I already posted earlier...

https://solarishandy.blogspot.com/2015/02/making-luns-visible-at-host-side.html

#####################################################################################

Sunday, 20 November 2016

High Availability (HA) in VMware vSphere !!!

Using Cluster concepts among ESXi hosts we can achieve high availability. In VMware we have two types of Clusters. In this post we will cover, incase of any system failure how the VMs will be migrated to other hosts in the cluster.

1. Distributed Resource Scheduler (DRS)
                           is a utility that balances computing workloads with available resources in a virtualized environment. Total resources will be distributed as user requirements among all hosts.

2. High Availability (HA)
                           is a utility that eliminates the need for dedicated standby hardware and software in a virtualized environment. When a Host is down, the VMs within that will be shifted to other hosts automatically. This reduces manual shifting overhead.

For this we need to create a cluster and move our hosts to that cluster...

It is preferred to maintain separate NIC in all the hosts for checking heartbeats. One NIC for normal data transfers and the other is dedicated for Fault tolerance management.

Click on any of the hosts, click on Configuration tab and then click on networking....

We can see only 1 NIC is available for Host1... Now let us add one more NIC. Click on Properties....


We can view the properties of our Virtual Switch...


Click on Management and then add new network....


Select the newly added NIC adapter...


Click Finish and so we added our NIC...


As we can see our second NIC is not yet assigned with any IP...


Click on properties to add a Network to this new NIC...


Select Connection Type "VMkernel" ... (We use this NIC for host management)


Here I am using my existing virtual switch for our Network traffic...


Give a desired name as "Network Label"


We can obtain IP automatically or can assign as per our range...


Review Summary one last time...


We can see the changes in our Networking tab...


Similarly I added NIC to my second host (Host2) and also assigned IP....


Host2 Networking tab....


Now we are good to configure HA cluster... Right Click on our cluster and click on settings...


Once we Enable HA, we can see vSphere HA in our Cluster Features...


Modify VM options as per our requirement....


Read the description of VM monitoring and choose accordingly, I prefer "Disabled" otherwise while monitoring even for short network drops the VMs will be restarted.


Datastore Hearbeating manages the preferences about what storage to be used. I selected both the storages, so both the storages will be used by cluster....


So far done with the minimum requirements and configuration part of HA cluster.

                                                   
                                         vSphere HA configured on both the hosts successfully........
 

Removed and deleted few VMs for space issue, dont get confused...

Current Scenario:
                        Below is the current status of VMs in my host1...... Windows_VM is on shared storage and VMware vCenter Server is on local datastore of Host1....

                                 HOST1                                                                                      HOST2
 

Let us test our cluster by powering off one of our hosts..... Click on Shut Down....


After shut down of Host1 my Windows_VM migrated to Host2 automatically, but VMware Vcenter VM is still down since it is originally located on datastore of Host1.


Now I powered on my Host1, so lets try connecting to it....


Now Host1 is back and so VMware vCenter VM is also back....


After Host1 is rebooted, below is the status of VMs in both hosts.....

                                  Host2                                                                                         Host1
 

Now lets try it in the other way, what happens when we shut down the Host2...


Shut Down Initiated....


Since Host2 is unavailable, both the VMs within Host2 are down...


Windows_VM is unrecheable for a while and switched back to Host1 with few network drops...


Windows_VM is back to Host1, since it is on shared storage but the other VM couldn't....


Finally after powering on the Host2, we have all our VMs back....


At first the Windows_VM is on Host1, so we shut down the Host1 and then the VM is migrated to Host2 automatically.

Then we tried with shut down of Host2, this time Windows_VM is switched back to available Host which is Host1. We have seen working of HA cluster in both the example scenarios.

#####################################################################################

Thursday, 17 November 2016

Clones and Templates using vCenter Server !!!

In this post, we are going to work on the concepts related to replication of  a Virtual Machine. VMware provides two concepts to deploy a Virtual Machine from existing VM. 

1) Using Template
2) Using Clone

At first let us see Cloning a VM using templates. For this we need to clone a template and then deploy a virtual machine from our template. 

Before deploying our cloned template, it is just an image which contains a guest OS, set of applications and our VM configuration. Once it is deployed, from then it is an individual VM.

Only difference between "clone and template" is, once we clone a template, we can do some modifications to the template before deploying. But when it comes to Cloning VM it will be the exact copy of our existing VM.

Login to our vCenter server, choose the VM and then right click on it...


Enter a desired name for our template....


Choose the Host or Cluster...


Current status of VMs in both of our hosts (before creating a clone/template)...


Specify a Host (where the template to created)....


Choosing datastore (where the VM files should be copied)...


Verify the details provided so far...


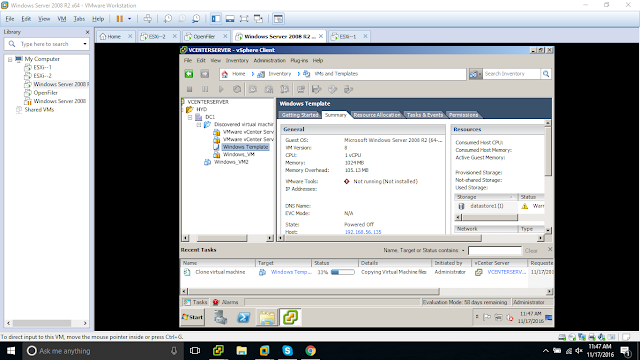
See the progress at the bottom....


Cloning a template is completed successfully...


We can check our VMs and templates from the following tab in Inventory....


This is where templates are stored and managed....


So far we cloned a template, now we are good to deploy VM using our template...
Click on Convert to Virtual Machine...


Choose a name and location for our new VM...


Choose the Host/Cluster on which VM should be deployed...


Specifying a Host


Then choose the Storage location...


Review one last time...

Observe progress bar at the bottom....


Deploying VM from template Completed Succesfully....


After deploying a new VM using template, we have total 3 VMs in our ESXi host1 (192.168.56.134)...


So far we covered Cloning a template and deploying VM using template...
Now we move on to the second type which is "Cloning a VM". 

Remember clone is the exact copy of existing VM (cannot make changes regarding system configuration)...


Choose Name and Location for our new VM....


Follow few things like choosing Host/Cluster and storage as we did while deploying VM from template.....


Guest Customization (observe the different options)....


Review one last time... 

Observe progress bar at the bottom....


My VM_clone virtual machine deployed successfully using clone of Windows_VM....


After deploying a new VM using clone, we have total 4 VMs in our ESXi host1 (192.168.56.134)...


We can see all our VMs from the Virtual Machines tab of our vCenter Server as follows....


#####################################################################################